
As
the title itself suggests, this article is about how you can add your pic /
authors image just before post title in blogger (blogspot) blog. It’s the
easiest tutorial you ever had. If you are not a techie guy and don’t want to
mess up with the HTML coding of your blog template then this tutorial is
definitely for you. We are going to do this by just adding one line CSS code in
your template. You can browse many professional bloggers blog, which contains
authors pic or we can say image just before their post titles, you can take an
example or demo of my blog which also contains the same thing. Adding author’s
pic just before post titles not only stylify your blog but also gives it a
professional look.


Let’s
see how we can do this? A step by step guide.
First
and the foremost, Before adding that CSS code to your blog we have to add our
image to Picasa Web Albums, so that we can use our image URL in that CSS code.
Another most important thing which you have to consider is the size of that
image.
STEP
1
Editing
the image, which have to be added in Picasa Web Albums so that correctly sized
image fits your post title and increases its professional feel.
(a) Choose your image which you wants
to show before your post title.
(b) Right click and choose “edit”, it
will automatically opens with paint or if you have any difficulty kindly choose
“open with” and select paint.
(c) Now crop it according to your
needs.
(d) Now go to ‘Resize’ just below the
‘crop’ option.
(e) Now select ‘pixels’ and deselect
‘maintain aspect ratio’.
(f) Fill both horizontal and vertical
column as ‘43’ or ‘45’ so that you will get a small square image which will fit
your post title.
(g) Now save it.

STEP
2
Uploading
your picture to Picasa Web Albums.
(a) Go to picasaweb.google.com and
login using Blogger Email and password.
(b) Click on “Upload photos”.

(c) Now you have two options either
you can drag that photo which we have edited or select it from your computer
hard drive.

(d) Now click “ok” and your photo
will be uploaded to Picasa.

STEP
3
Adding
CSS code to your Blogger template.
(a) Go to Blogger and login with your
Email and password.
(b) Select your blog and you will be
directed to your dashboard.
(c) Now open “Template” and then
select “Customize” which will enable you to edit your live blog.
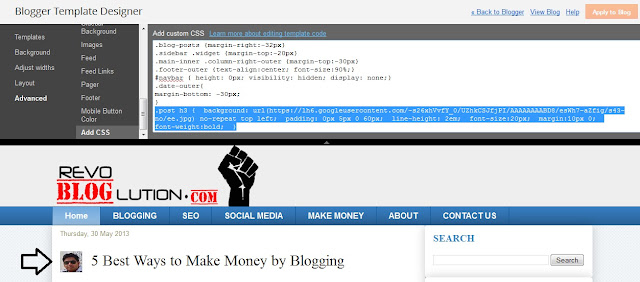
(d) Go to “Advanced” tab and then
select “Add CSS”.
(e) Copy and Paste the code given below.
CODE-
.post h3 { background: url(YOUR IMAGE
URL) no-repeat top left; padding: 0px
5px 0 60px; line-height: 2em; font-size:20px; margin:10px 0; font-weight:bold; }
(f) Remember to delete the 'Read More' link' after pasting the above code.
(g) To add your image URL just go to Picasa Web Albums and click your image to open.
(g) To add your image URL just go to Picasa Web Albums and click your image to open.
(h) Right click your image and select
“copy image location”.
(i) Paste it at the place of “your
image URL”.
(j) Apply to your blog, if you are
happy with what you have done.

NOTE-
If you want to remove your photo from post title then just delete that CSS code.
Kindly comment, if you liked this tutorial.
Subscribe Updates, Its FREE!

Article by Sandeep Gupta
Sandeep has written 55+ articles. If you like this post, you can follow Bloglution on Twitter. Subscribe to Bloglution feed via RSS or EMAIL to receive instant updates.
I don't get this. I tried pasting the URL but the image doesn't appear!UGH
ReplyDeleteThanks Denmark for your valuable comment, kindly recheck if have mistakenly copied "link location" instead of "Image location" here, inside brackets. which looks like (https://lh6.googleusercontent.com/-s26xhVvfY_0/UZhkCSJfjPI/AAAAAAAABD8/esWh7-aZfig/s43-no/ee.jpg).
DeletePaste your image url in your browser address bar and hit enter to check if it displays your image correctly.
just remove 'h3' after .post - and u ready to go....
Deletethanks for the post hopefully I am going to follow this tutorial in my blog.
ReplyDeleteThanks Rabbi. Expecting your visit again.
DeleteVery Nice Info Sandeep Gupta. thanks. Keep it up
ReplyDeleteBest Online Hostings
Domain name $1.49 only
Best Online Store
Hi,This works like a Charm,Thanks
ReplyDeletehttp://expertsharepoint.blogspot.de/
What to do if there is more than 1 author? On my blog there are 2 authors, what to do than?
ReplyDeleteRapidly this kind of internet site can easily unquestionably recognition among virtually all blogging and site-building and also site-building individuals, to be able to the meticulous content or simply opinions. Brochure Designing
ReplyDelete